Posts

Showing posts from June, 2011

Blogger jQuery Tabbed Sidebar Widget Tutorial

Image
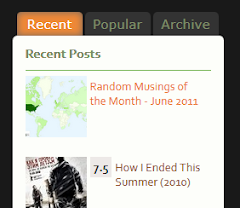
How to install a jQuery tabbed sidebar widget on your Blogger blog. Recently, over on my main blog Bonjour Tristesse , I installed a tabbed widget to more efficiently use the space on my sidebar.  Here in this post, I will explain how to accomplish this on your own templates. First of all, you need to have jQuery installed on your template.  jQuery is a powerful JavaScript library that allows you to do many cool things with simple coding and it is very easy to install onto your blog.  We just have to simply include the scripts on our template.  These scripts are conveniently hosted for us by Google. Installing jQuery The first step is to go to your Dashboard and click on Design > Edit HTML .  You should see a page like the one below: Now click on " Download Full Template " to backup your current template just to be safe. Now search for the following line of code in your template: </head> and place these lines of code before that one: <script src='http://aja

Set up your Blogger profile

Image
One simple thing that I noticed a lot of new bloggers neglecting to do is they don't have a link to their blog on their Blogger profile. You may not realize, but by default your Blogger profile is empty.  So for instance if you follow another blog, nobody can follow you back because they won't find a link to your own blog in your profile. Also, if you do not have an avatar, you will be added to the end of the followers list instead of at the front.  So someone with a lot of followers might not notice you there and won't be able to follow you back. Thirdly, a good way to find similar blogs to yours or other blogs you might be interested in is to fill out the interests section with your relevant interests.  These will become clickable links to other bloggers with the same interests that you can browse through to find blogs you might like.  More importantly, it adds you to these same lists so other bloggers can browse and find you. So make sure you go to your Blogger dashboard

Reigniting Houston History

Image
As a native Houstonian I was immediately drawn to the neighborhood near where my Italian ancestors lived, the Historic Sixth Ward, when I began a search for a permanent home for Axiom. I knew immediately that Fire Station No. 6 on Washington, constructed in 1903, could spark creative energy for our team once restored to its historic charm. Restoring the building has proven a major undertaking, especially with the market downturn stopping the project for over two years. But in 2009 we began the exterior renovation to bring the 4,000 square foot building back to its original appearance. One of only seven stations serving the rapidly growing city of Houston in 1903, just after nearly 45,000 Galvestonians flocked to Houston after the 1900 hurricane. The classic Italianate was hailed as the most modern fire station in Houston. The all brick construction was a departure from earlier wood buildings which often fell victim to fire. With 27 windows and hot AND cold indoor baths, it was a luxury

Remove borders and box shadow from images

Image
How to remove the borders and box shadows from images on your Blogger blog. Most of the default Blogger templates display a white border and box shadow frame around every posted image like the example below: But some bloggers prefer to have their images displayed without the border and shadow like so: There are two ways to accomplish this depending on whether you want to completely remove the effects for every image or just on specific images. Method 1: If you want to remove the borders from all of the images on your blog, add the following code to your CSS.  Design > Template Designer > Advanced > Add CSS : .post-body img, .post-body .tr-caption-container, .Profile img, .Image img, .BlogList .item-thumbnail img { border: 0px; -moz-box-shadow: 0px 0px 0px rgba(0, 0, 0, .0); -webkit-box-shadow: 0px 0px 0px rgba(0, 0, 0, .0); box-shadow: 0px 0px 0px rgba(0, 0, 0, .0); border-radius: 0px 0px 0px 0px; background: none; } Method 2: If you want to selectivel

Swap blog title after page title

Image
How to swap blog title after page title. If you look at your browser's title bar you will notice that Blogger's default templates display your blog title in front of each page or post title. For example this page title would normally be displayed as: Stupid Blog Tricks: Swap blog title after page title This is not great for search engine optimization and makes it difficult for people to search for your posts. The reason being is that users are more likely to search for specific post content rather than the actual name of your blog. So having the post titles first increases your chances of being found. To have your blog title displayed after the page title like so: Swap blog title after page title | Stupid Blog Tricks Look for this line in your template: <title><data:blog.pageTitle/></title> and replace it with this: <b:if cond='data:blog.pageType == &quot;index&quot;'> <title><data:blog.title/></title> <b:else/&

Center your header image.

How to center your header image. By default, Blogger aligns your header image to the left. But some might want their images to be centered. There are a couple ways to accomplish this depending on how you've setup your header. If your header is set to " Behind title and description " Add the following code to your CSS: #header-inner { background-position: center !important; width: auto !important; } If your header is set to " Instead of title and description " or " Have a description placed after the image " Add the following code to your CSS: #header-inner img { margin: 0 auto !important; }

Welcome

Hello and welcome to Stupid Blog Tricks. I created this blog mainly to document for myself the various Blogger tricks and tweaks that I have discovered since I started blogging last September.  Somewhere to keep all this information in one place. I will be posting some blogging observations, and how to's on stuff that I've integrated into my main blog everything from basic commonly asked tips to advanced custom widgets.  Hopefully some of what I've learned can help others make the most of their Blogger experience. Cheers!